

How We MADE a Butcherblock Dining Table!
- Jessica Doberneck

- Sep 17, 2020
- 8 min read
Updated: Jun 3, 2022
When Tyson and I first got married I was still trying to find my style! Somehow, after each furniture/home decor purchase it seemed like I was unintentionally inching my way into the antique farm style. To be honest, that's not really my style but I tend to chase good deals and it seemed like everything on Facebook Marketplace at the time was very antique farm. We also lived in Idaho and the antique farm style has been Idaho's style for decades haha.
What solidified commitment to the farm-style was the beautifully unique dining table and chairs set that we purchased for $250 at an antique store in Idaho Falls. It had awesome claw legs, 2 unique cathedral chairs combined with 2 farm chairs, and had the typical antiqued paint job. It sat 4 but, I loved that if we wanted to throw in our bench on one side we could squeeze in 6 people at the table.


Once we bought our home, I began switching to a more modern-traditional style. It matched the integrity of our home and I was beginning to decipher and discover my personal style. As we approached our kitchen remodel, I realized these antique farm items weren't going to match. Like, at all! Instead of, "If you give a mouse a cookie," it was "If you give a kitchen a remodel!" If we remodel the kitchen then we would need new bar stools; if we needed new bar stools, we also need new light fixtures; and if we needed new light fixtures, then we need a new dining room table. After all, the bones of our Idaho home were very mid-century modern, so the idea of bringing the home back to its original roots was very satisfying.


We sold all our old things on Facebook Marketplace without any issue; our light fixtures ($100), bar stools ($100), and our dining room table ($250 - the price we originally bought it for!).
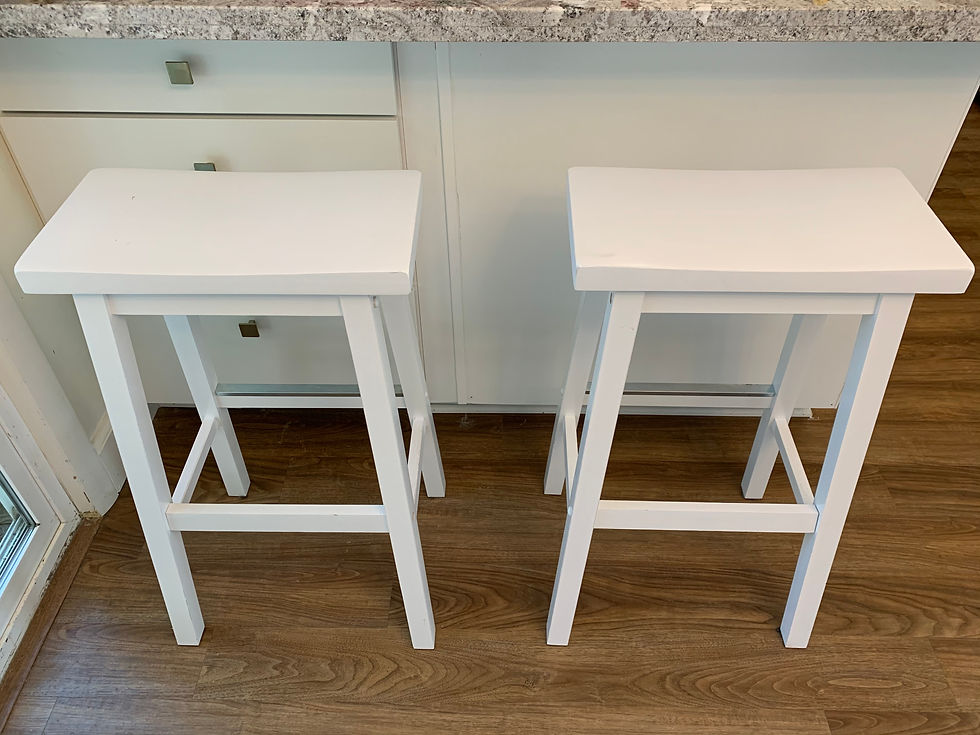
We got 2 new bar stools for $30 on Facebook Marketplace.
All new light fixtures from Wayfair for about $550.


And as for a new dining room table... this wasn't so easy. We were about a month away from putting our house up for sale and I didn't want to commit to a super nice, brand new, long-term table if I didn't know what our next living situation would look like and how it would accommodate our dining set. Considering we just needed a temporary dining set to match our quality renovations and the rest of our staging style, we decided to stick under a $300 budget (which really limits your options). I searched and searched and SEARCHED on Facebook Marketplace and couldn't find anything that matched our style and budget.
Then, finally, I found THEEEEE MOST beautiful table and chair set I've EVER SEEN - but that's a long story and I'll have to save it for another blog post ;) Haha. Long story short, the sale didn't work out and we were back to square one! Seeing that I couldn't buy a new table within our budget and there weren't any used dining sets that would match, we were pushed to our last option of MAKING a table!
Tyson had a brilliant idea to bind wood boards together and frame the sides! Though it would have clean lines (more modern industrial), I was a little hesitant that it would still resemble a farm-style. I would have to be very strategic about the chairs and the wood stain we picked to ensure it complimented the rest of our living space.
After wandering through Home Depot for hours gathering materials, we realized we had about $300 in tools ALONE sitting in our shopping cart just to make the dang thing! Though we love collecting new tools, now was not the time. Feeling defeated, I took a walk around Home Depot. I looked at the bathroom aisle, the flooring aisle (my favorite), and then the sink and faucet aisle. At the end of the aisle were varying sizes of butcher blocks...
Butcher blocks....... Huh....... I wonder if.......
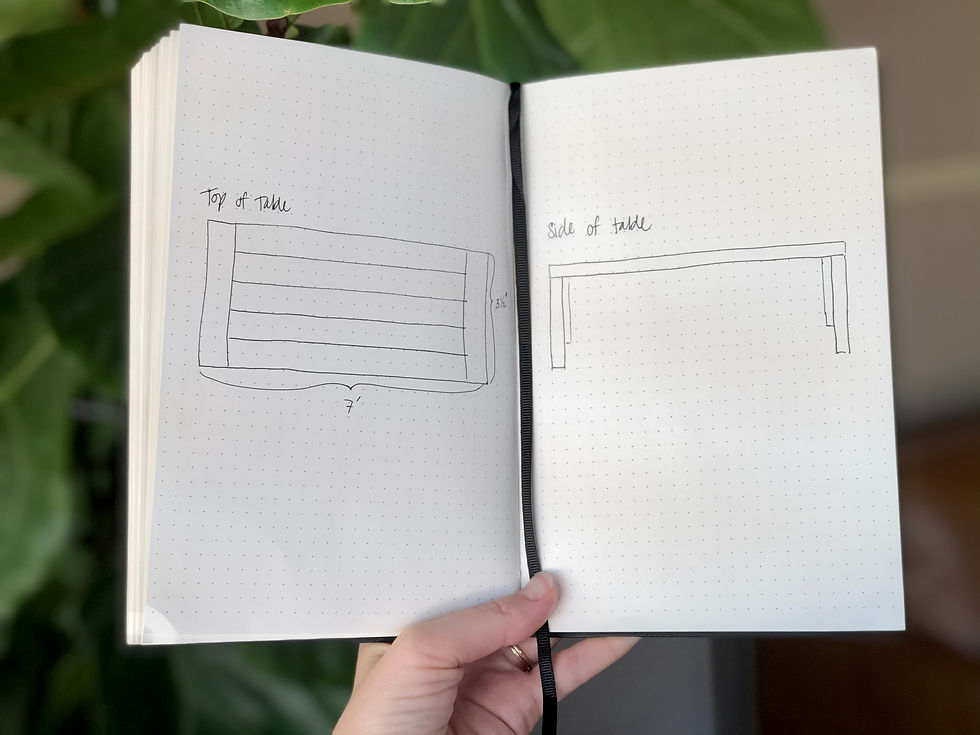
I ran and got Tyson and pitched the idea of just getting a 6 ft long by 3 ft wide butcher block and buying hairpin table legs! Easy, peasy, lemon squeezy! The butcher block was expensive - but the style would match our home PERFECTLY, and we also weren't risking the potential flop of a major DIY project we've never done before! I mean, all we had to do was slap on some stain, seal it, and screw on the legs! We also came to the realization that no matter how hard we tried, it wasn't feasible to keep our budget under $300 - we were just running out of time and options. This wasn't disappointing to us because we loved our butcher block table plans and knew it would be a much more long term dining room set rather than a quick bandaid fix to stage our home.
We purchased the butcher block from Home Depot ($369). We ordered hairpin legs on Amazon ($44.99). We then drove over to Ashley's Furniture to shop around for chairs. (Have I mentioned that I LOVE ASHLEY'S FURNITURE?! Because I do!) We found these chairs that we instantly fell in love with! They were sleek, comfortable, practical, and matched our staging and personal style for only $80 each!
Funny story about those chairs... If you've read my blog post about our miracle range purchase, this will ring a bell. Their in-store kiosk computer was showing the chairs at $80 each. But when they rang us up they were showing up as $130 each. I took the sales representative back to their kiosk and showed them the price we were seeing. So, lucky for us, we purchased 4 chairs at the wholesale price!!! I have no idea how this keeps happening! The Budgeting Angels must have been assigned to watch over us! Haha.
The store had 4 chairs (exactly what we needed), but 2 of the chairs were for sale and the other 2 were for display only. We purchased 4 chairs, 2 to be taken home that day and 2 that would be delivered to the store in 4 weeks - yikes! 4 weeks was cutting it close as we were hoping to list our house for sale in about 4 weeks. On our drive home, I hopped on my phone and found the exact same chairs on Amazon! Ironically, they were already in my shopping cart along with probably 15 other similar styled chairs haha. I dug a little deeper and found a set of 2 chairs, used - but looked new, for $62.71 each! So, we called Ashley's Furniture and canceled the order for the 2 additional chairs.
While we waited for our orders to arrive from Amazon, I spend a lot of time trying to pick a stain. I couldn't do anything warm (orange, yellow toned) or it would really clash with our kitchen. But I couldn't do a grey stain because we already had enough grey and if I got the wrong tone of grey it could really clash. I really wanted our table to be a statement! We already had a lot of lighter colors and needed something dark to anchor the space. By the process of elimination, our stain of choice was "Ebony." Keep in mind that I'm usually very scared to use dark colors - it's just not my style. I'm not that bold and I love things to feel light, airy, and whimsical. So, walking from the stain aisle to the check out counter with that ebony stain in hand was the longest walk of my life! I second-guessed myself every step of the way! (I actually second-guessed myself until about 5 days post-project! I knew it was the right color, it just took time for me to adjust haha!)
2 days later:
Table legs - CHECK!
2 chairs - CHECK!
Wood stain - CHECK!
It's go time!
Here's HOW to make a butcher block table in 3 easy steps:
Screw on the Legs - You can do this at any point in time, but it just made it easier to pick up and move the table around throughout the process. It also was nice to have the tabletop raised for all the staining and varnishing. Depending on the legs you purchase, the instructions may vary. However, we do have one of tip for installing hairpin legs: The legs often come slightly slanted outward, so be sure to screw in your legs a few inches from the edges so your legs don't stick out from the corners of your table.
Stain - Pick your stain. Make sure it matches the tones of your space and any other wood furniture nearby. I would recommend testing your stain on the bottom of your butcher block before committing to a stain color. Prep your space and yourself by laying down a LARGE plastic sheet under your butcher block (paintbrushes can flick the stain far and wide, so preferably do this outside), and ALWAYS wear gloves - this stuff is sticky and is a pain to scrub off! Dip your brush into the can, tap off the dripping excess, and apply the stain with long brush strokes in the direction of the wood grain. Each coat you do will darken the color - so take that into account. For fear of losing visibility of the wood grain, we only did one light coat. Allow the stain to sit and dry for at least 8 hours. We waited a full 24 hours to be sure.
Seal with Varnish - There are many ways to seal a butcher block and they all depend where you plan to put it. Since this isn't a kitchen counter, it wasn't necessary to go the full 9 yards with oils and what not. 2 coats of varnish will do the trick just fine! We went with a water-based (oil-based would have been just fine too) matt finish varnish. Looking back, we really wish we would have chosen a semi-gloss instead - it would have highlighted the wood grain much more! Prep your space and yourself (cover your area and put on some gloves). Some recommend applying the varnish with a foam roller but they can leave air bubbles that are a pain to get out. We recommend applying the varnish with a really nice paintbrush, wait for it to dry (as directed on the can), and sanding the whole butcher block evenly in long strokes to get rid of any visible paint strokes. We did 2 coats of varnish and 2 rounds of sanding.
I think I covered everything, but if you have questions feel free to reach out!

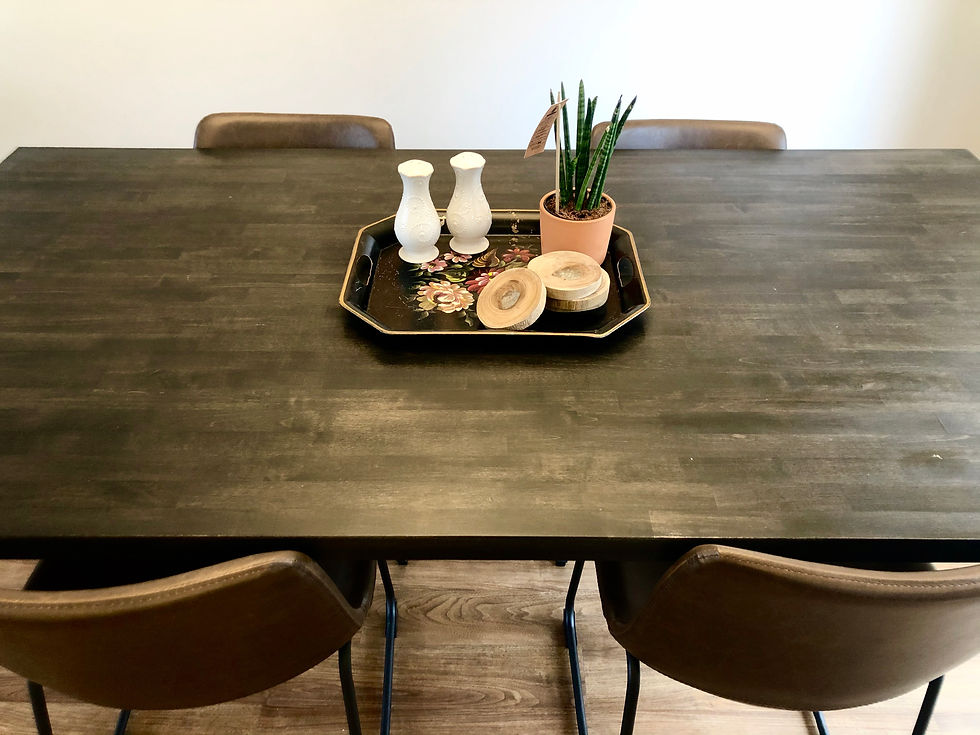
We were more than pleased with how our dining set turned out! Compared to all the expensive brand new dining sets I dreamed of getting, our butcher block table and chairs trumps them all. It's a modern set with all the trendy features, not to mention the cozy, easy to clean (baby-friendly) chairs! Finishing this table was the last project for our open living area and it tied all the rooms together while adding more depth to the space.


Even though the initial goal was just to get our house staged nicely, we plan on keeping this dining set until we outgrow it! It'll be a sad day when we have to part with this gem - there's always something special about a successful DIY project!

Side Note: See those globs of varnish dripping down the side of the table??? Yeah, learn from our mistake and make sure you wipe up ALL 4 SIDES of your butcher block with your paintbrush as you are applying! Hahaha! Otherwise, you'll have this mess on the side of your table! The funny thing is, we actually didn't even know those globs were there until I got these photos back from our photographer! You should have seen my face - I was mortified haha. I ran downstairs to the table and sure enough... there were globs on, of course, just that one side! We have since sanded them down, I swear!
Sincerely,


That is a great table. Good for you! I hope others are enjoying your blogs as much as I am!